How to Make Homemade Apple Cider Vinegar
Apple Cider Vinegar Recipe from Apple Scraps
Ever feel a pang of guilt tossing those apple cores and peels into the compost bin? What if I told you that 'waste' could become one of the most versatile and valuable staples in your pantry? Just a few weeks ago I was demonstrating at an event, how to reduce food waste in your home and build resilience at the same time, I took a pile of apple scraps and created a fresh batch of homemade Apple Cider Vinegar!
This isn't just about saving money (though that's a nice bonus!). It's about easy wins, and understanding the incredible transformations that happen right in our own kitchens. Making your own ACV is a prime example of turning perceived waste into a powerful resource.
What is Apple Cider Vinegar & Why Make Your Own?
Benefits of homemade ACV:
Zero Waste: Transforms scraps into something useful.
Cost-Effective: Nearly free! Especially if you’re growing your own.
Control over Ingredients: No added preservatives or weird stuff.
Health Benefits: It aids digestion, has versatility in cooking/cleaning and is THE vinegar you need for making a brine for pickles.
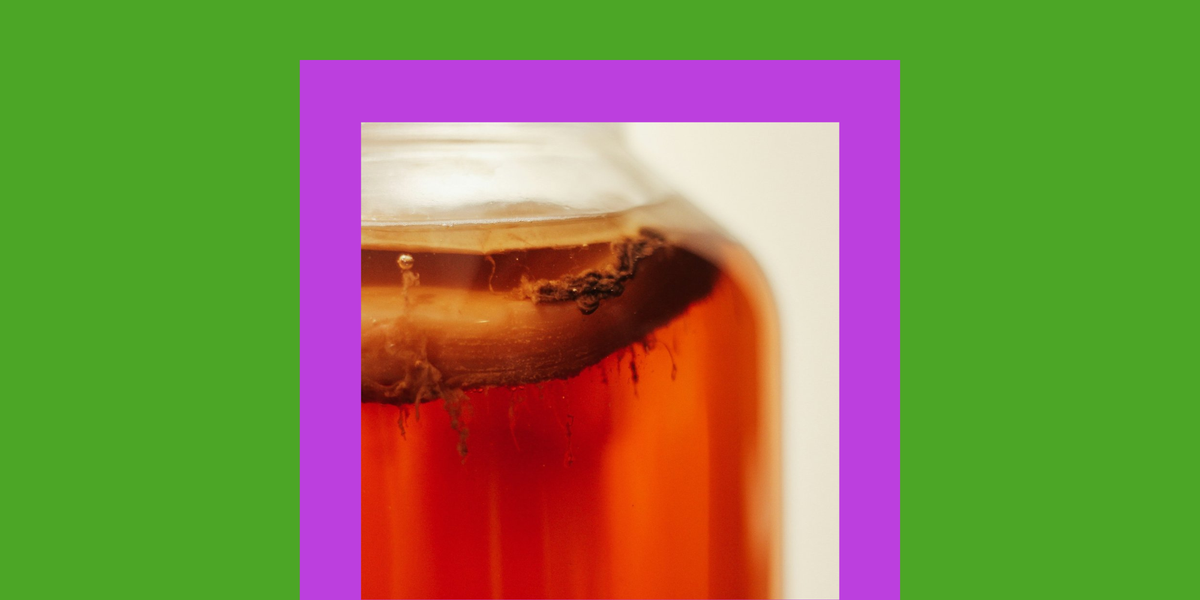
The "Mother": The Mother forms when apple cider is exposed to oxygen and is fermented. the Mother is made up of beneficial bacteria, yeast, and cellulose. It is a sign that the ACV is raw, unfiltered, and unpasteurised (which is what you want!).
ACV Ingredients & Equipment:
Ingredients:
Apple scraps (cores, peels, bruised bits - organic if possible for best results, but not essential)
Filtered water (non-chlorinated)
Sugar (white or brown, just a little to kickstart fermentation)
Optional: A splash of raw, unpasteurised ACV with the "mother" (to speed things up, but not necessary).
Equipment:
Large, clean glass jar (e.g., Mason jar, preserving jar)
Stirring spoon (non-metal)
Breathable cover (cheesecloth, coffee filter, clean tea towel)
Rubber band
Strainer or sieve
Clean bottles for storage
Step-by-Step Instructions:
Preparation:
Gather Your Scraps: Collect apple cores and peels from your cooking. The more you have, the stronger your ACV will be!
Clean Your Jar: Ensure your glass jar is spotlessly clean and sterilised if possible.
The Fermentation Process (Phase 1: Alcohol Fermentation):
Fill the Jar: Place your apple scraps into the clean jar. Fill it about 1/3 to 1/2 full.
Add Sugar & Water: Dissolve 1-2 tablespoons of sugar in a cup of warm, filtered water. Pour this over the scraps, then top up the rest of the jar with filtered water, ensuring all scraps are fully submerged. You might need to weigh them down with a small, clean non-metal weight (a shot glass or fermentation weight works).
Cover & Store: Cover the opening of the jar with cheesecloth or a clean tea towel and secure it with a rubber band. This allows airflow but keeps bugs out. Store the jar in a warm, dark place (like a pantry or cupboard) for about 1-2 weeks.
Daily Stirring: Stir the mixture daily with a clean, non-metal spoon. This prevents mould and aerates the mixture. You'll start to see bubbles and a cloudy appearance - that's good! It means the yeast is working.
The Second Fermentation (Phase 2: Acetic Acid Fermentation):
Strain: After 1-2 weeks, when the bubbling slows and the liquid smells slightly alcoholic/yeasty, strain out the apple solids. Compost them or feed it to your chickens! You're left with a cloudy liquid.
Introduce the 'Mother' (Optional but Recommended): If you have a 'mother' from a previous batch or from raw ACV, add it now. This will speed up the process. If not, don't worry, one will form naturally!
Second Ferment: Cover the jar again with the breathable cloth. Return it to your warm, dark spot for another 2-4 weeks (or longer). During this stage, a gelatinous 'mother' may start to form on the surface. This is a sign of healthy fermentation!
Taste & Test: Taste the liquid every few days after the first week. It will gradually become more acidic and vinegary. Once it reaches your desired strength, it's ready!
Storage:
Bottle It Up: Once happy with the flavour, strain the ACV one last time (you can keep the mother for your next batch!). Pour into clean, airtight bottles.
Store: Store your homemade ACV in a cool, dark place or in the refrigerator to halt fermentation. It will last for months, if not indefinitely!
Troubleshooting Tips (Common Issues & Solutions):
Mould: If you see fuzzy, colourful mould (black, green, pink), unfortunately, you need to discard the batch and start over. This usually happens if scraps aren't fully submerged or there's not enough sugar to start.
No Bubbles/Activity: Ensure your water is non-chlorinated, the temperature is warm enough, and you've added a little sugar. Sometimes it just needs a bit more time.
Scraps Floating: It's crucial to keep all apple scraps submerged to prevent mould. Use a weight if needed.
Ways to Use Your Homemade ACV:
Salad dressings
Marinades
Drinking water with a splash (diluted!)
Hair rinse
Natural cleaner
Fermenting other foods
See? It's incredibly simple and so rewarding! Every time you use your homemade ACV, you'll feel that quiet satisfaction of making the most of what you have. Have you made your own ACV before? What are your favourite tips or uses? Share in the comments below!
Join The Resilience Village:
For more practical tips, shared wisdom, and a supportive community eager to embrace resilient living, come join us in The Resilience Village! If you’ve felt the bedrock of our world shaking and you’re ready to stop winging it and start building, this is your invitation. We are currently 400+ families strong, and we connect, learn, and grow together. You’ll find a supportive community ready to help you on your self-sufficiency journey. Click here to get started, it’s free.